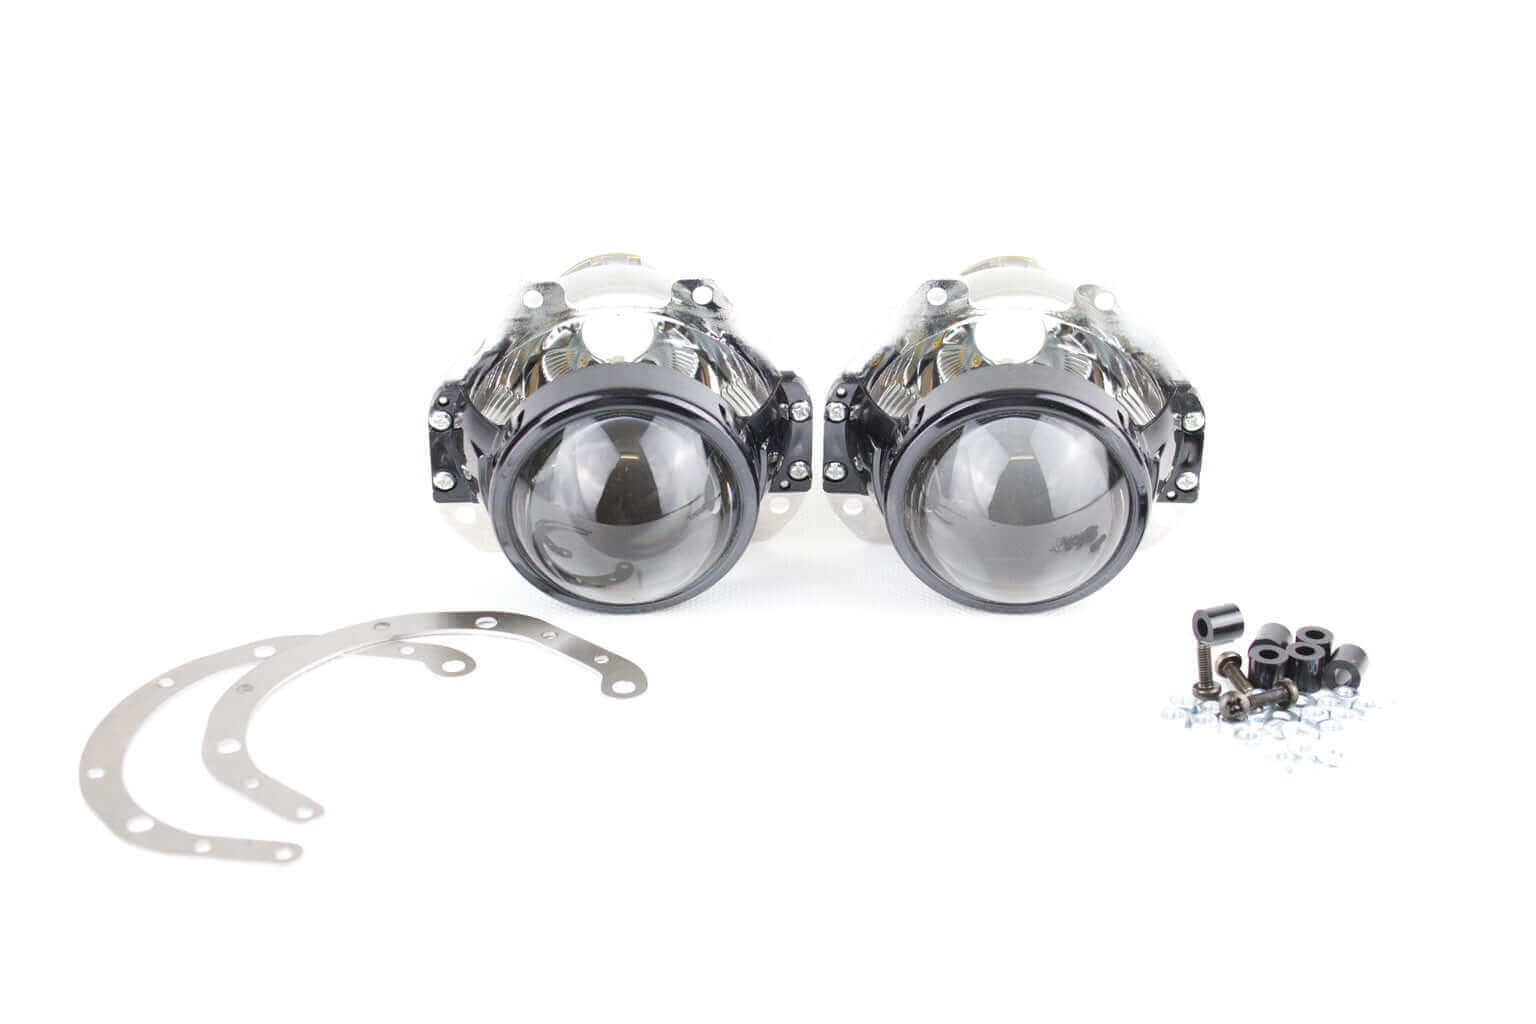


This Chevrolet Camaro 5th generation HID xenon headlight repair and upgrade kit is based on one of our best-selling kits for the Ford Mondeo MK4. This kit contains everything you need to swap your old, blacked-out projectors for powerful new bi-xenon HID projectors. Using a custom-designed mounting bracket, it makes retrofitting quick and easy. And, most importantly, it will take your Camaro to the next level – just check out the difference between the old and new pictures in the video! This is way beyond what the majority of OEM projectors can achieve.
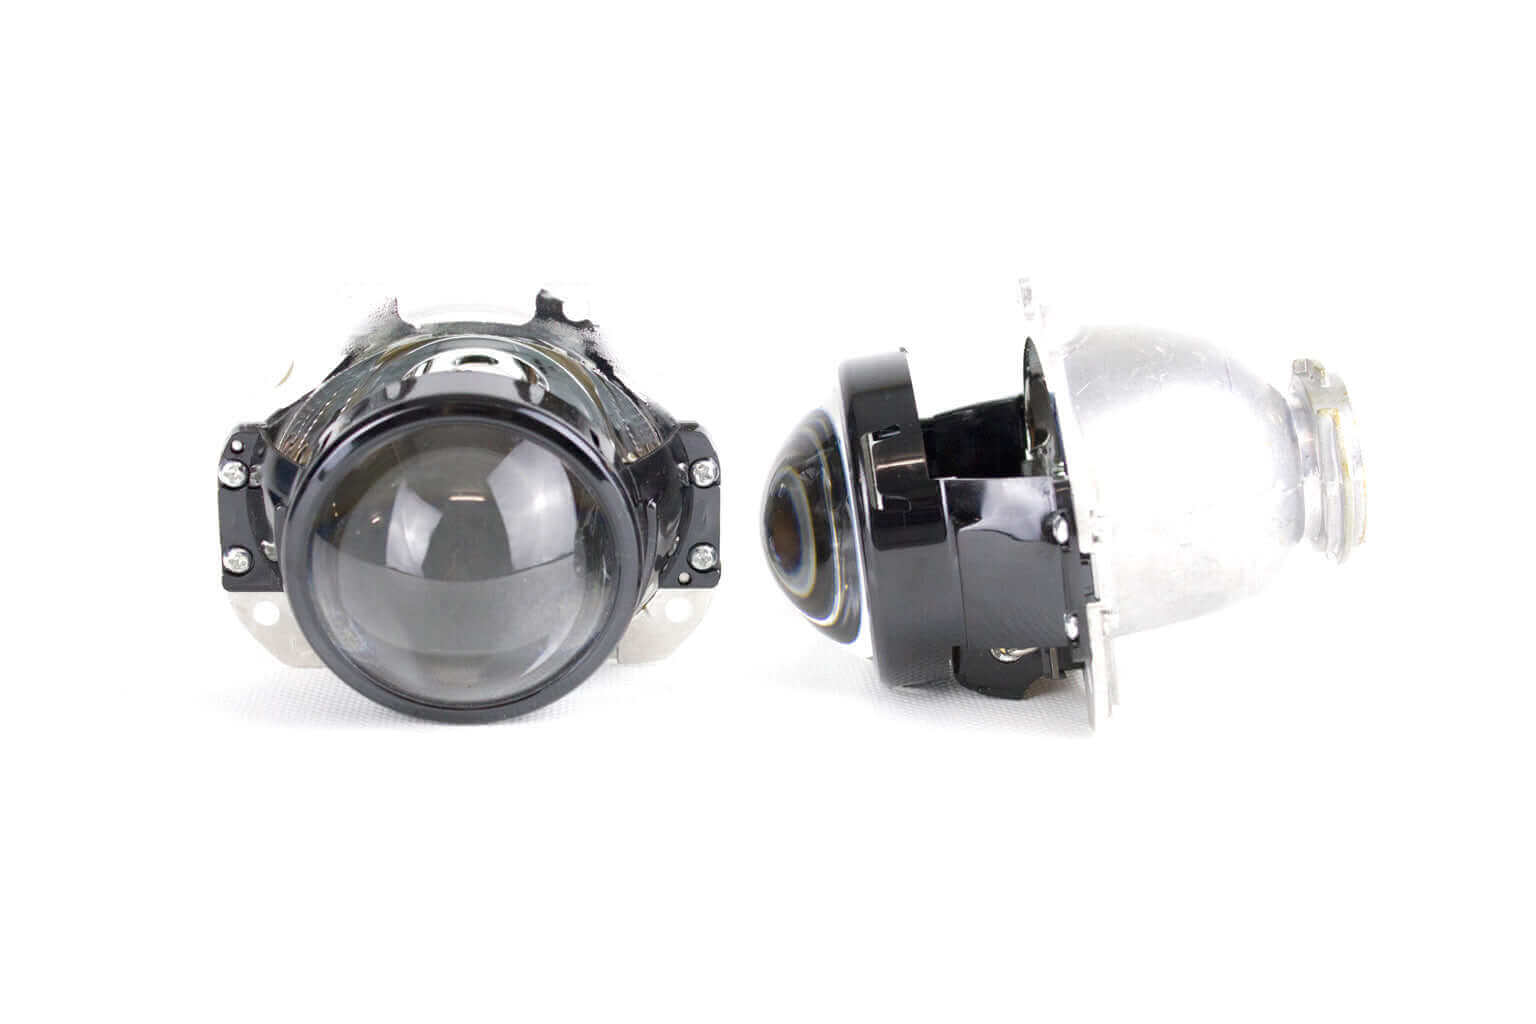
The TL-R is an incredibly bright bi-xenon projector, enabling you to re-use your D3S bulbs and OEM ballasts. So If you’re happy with the ballasts that you’ve already got, simply leave them in place. Also, the bi-xenon and leveling function keeps working.
Lastly, this kit provides every single part that you will need for retrofitting. In order to keep the price low, we have however assumed that you will keep your existing xenon HID bulbs. Depending on how old those are, you may want to also order a new set of bulbs to get the most out of your retrofitted system. Xenon bulbs do lose up to 70% of their maximum brightness over time.
This complete Chevrolet Camaro 5th gen retrofit kit is inspected by our internal quality control and comes with a solid 2-year warranty. It also includes highly rated technical support from your lighting experts at Retrofitlab.com.
Should you have any questions prior to purchase, please refer to our FAQ page or start a chat below. You can also download our free brightpaper on automotive lighting. Nothing beats making an educated decision!
We look forward to brightening your day (not to mention your night)
Installation
This is an easy retrofit that even complete novices can do, but those with more skills and experience will be quicker. Discounting removal and replacement of the headlights, you could expect the job to take anything from less than one to two hours.
You have to open the Chevrolet Camaro headlight. This is not too hard because a softer type of permaseal is used. The rest of the installation is quite easy.
Some parts of the projector need to be removed to make it fit, we can do this for you (modification option).
For detailed instructions, please refer to the installation video.
The leveling system keeps working because the leveling is not done via the projector itself but via the frame, it is mounted to.
The high beam / bi-xenon function also keeps working, the cable to the original projector high beam mechanism can simply be connected/plugged into the new projector because the connector is the same type.
FAQ and DIY information
For general installation and DIY information, please check our FAQ and/or DIY pages.
FAQ for frequently asked questions, and answers :-), about products, product information ordering, shipping, returns, warranty, etc. You can find the FAQ PAGE HERE
DIY for Do It Yourself information about installation, product details etc. You can find the DIY PAGE HERE
Professional installation
This complete kit has been especially developed to enable retrofitting at home, saving you the cost of installation. However, should you prefer to have the kit installed by a professional? Check out LIST OF DEALERS / INSTALLERS
Disclaimers
These products are not ECE or DOT/FMVSS108 approved and must not be used on public roads in any exterior application. Use on public roads will invalidate both the operating license and insurance coverage. You can find more info HERE
The product images are for illustration purposes only and may not be an exact representation of the product. Actual products may vary due to changes in manufacturing/product enhancements. You can find more info HERE
This complete kit has been specially developed to enable retrofitting at home, saving you the cost of installation. However, should you prefer to have a professional carry out the retrofit,
To find the nearest workshop, please refer to Professional retrofitting
The installation video is for the Ford Mondeo Mk4, but the same projector is used in the Camaro. The mounting of the projector to the bracket is te same.
This customer video is intended to provide a general idea of the output and light pattern from a projector retrofit. It does not necessarily represent the exact setup in this product/kit, it's made with the Optimus TR mini with Osram bulbs
Worldwide Tracked shipping
We are based in Europe (the Netherlands) and we ship worldwide. So shipping to the United States, Australia, Canada etc. is not a problem at all.
All our orders have a track and trace / tracking code, so you can check the progress. The orders are processed by ourselves and send out from our own warehouse.
Delivery Time
We are known for our fast deliveries. All delivery times start when we have received your payment. The products that are in stock will normally be shipped within 1 working day. The shipping time varies based on the destination. Please check the estimated shipping (working) days and costs below. We ship directly from our warehouse in The Netherlands.
Shipping costs
Almost all of our orders will be shipped by tracked parcel shipping. We try to use the best option based on price, delivery speed and service. Most of our shipments are shipped with UPS, sometimes we also use DPD or PostNL.
You can find the shipping costs and shipping times for parcel shipping for inside and outside the EU in the table below.
| Zone | Countries | Price | Working days est. delivery |
| Domestic - UPS | The Netherlands | € 7,99 | 1-2 |
| EUR 1 - UPS | Belgium, Germany, Luxembourg | € 10,98 | 2-3 |
| EUR 2 - UPS | Austria, Bulgaria, Croatia, Czech Republic, Denmark, Estonia, Finland, Greece, France, Hungary, Ireland, Italy, Latvia, Lithuania, Poland, Portugal, Romania, Slovakia, Slovenia, Spain, Sweden | € 14,98 | 3-5 |
| EUR 3 - UPS | United Kingdom, Norway, Switzerland | € 17,49 | 3-6 |
| Rest of Europe - UPS | € 19,98 | 5-7 | |
| US - UPS | United States | € 34,50 / ~$ 38 | 5-7 |
| Rest of the World - PostNL | € 35,95 | 10-12 |
Tracking shipments
When you choose parcel shipping, you can follow your shipment. You will receive an e-mail from us with a tracking code as soon as your order leaves our door.
Delivery
The carriers for parcel shipping choose their own schedule for deliveries. Remember that you need to be present at the delivery address during working days from 9 till 5 in order to receive your order. It remains your responsibility to make arrangements for the way that the order is received at the delivery address. Orders we sent by envelope will arrive, even if you are not at home.
UK prices, shipping and taxes
UK prices / taxes are based on the order amount. For more information please see this FAQ item: UK prices and taxes.
You can find other products in the collection; Chevrolet Camaro